1) Authentic backdrops - paint - If space allows in the display cabinet and you don't need much then a stretched canvas at the rear oil or acrylic painted with a suitable view is a great starter. You can even use a canvas board cut if necessary to the appropriate size. My view is to team up with a local artist and outsource this unless you or a close relative can come up with the goods. If you are a professional taxidermist you can make this a more formal business arrangement.
Soldering Supplies
2) Authentic backdrops - photos As above but use a photo of the natural habitat you'd typically find the specimen in. The choice you then have is to have the photo suitably enlarged and either left 'as is' or through Photoshop or other image manipulation software made to look like a painting. Digital photos are obviously best for this, but standard prints may be scanned for this purpose or taken to your local printing centre. For true authenticity, a photo taken at the scene from where the specimen was obtained is a good idea if suitable.
Soldering Supplies
3) For the scene generally, it is a good plan, in all cases, to make a false bottom for your display case and affix the 'scenery' and your specimen to this prior to installation.
You will want to recreate the habitat of the specimen as accurately as possible so use as many of the following as you wish
4) Soil - as the object is to represent the specimen in the midst of its natural surroundings, the soil must be replaced by something light, and yet so like the original substance that the difference is not noticeable. This can be achieved by mixing enough plaster-of-paris with some PVA glue to make a cream. Then with a small brush cover every part of the groundwork with this composition. Probably by the next day it will be dry. Then paint it with thin glue and dash on plenty of sharp sand (silver sand is the best). When dry, proceed to colour the work with oil colours, well thinned with turps, blending them well one with the other suitable colours for soil are :
Yellow, burnt sienna (with or without burnt umber), and black, making the hollow parts rather darker, and dusting on Saxon green on the higher parts. Another option is to use scenic scatter which is readily available from model shops or online and comes in various shades. This is laid on a PVA glue base.
5) Similarly with rock, you will need a lightweight alternative. This can either be achieved by forming a chicken wire frame over which is laid plaster of paris or scrap newspaper daubed liberally with diluted PVA glue. Another option is to soak screwed up 'balls' of newspaper again soaked with PVA glue solution and place this in an area to form a 'rocky' base. This should then be covered with small square pieces of tissue paper soaked in a PVA solution. Once dry paint and cover with coloured scatter, this gives a good earth or grass appearance and is available from good model shops. A final alternative for making a rock face for which you'll need
o Some Expanded polystyrene, the stuff used for packaging
o A Hacksaw or Stanley knife
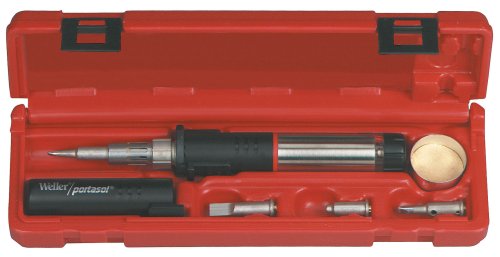
o A Soldering Iron (you could also use a knife to make the rock pattern)
o White poster paint
o Black enamel paint
o A paintbrush
First, grab your polystyrene and cut off a (or a number of) thin slivers with either a hacksaw or a knife for size of the gap you are going to fill. Once cut to size it's a good idea to break off some of the top to make the shape more random, as you'll rarely see a perfectly rectangular rock face. Don't worry about neatness here, just as long as you don't tamper with the edges you've just lined up. Now, to the tricky (fun?) part: the soldering. (note: you could use a specially designed heat knifes for carving polystyrene. Make sure you use a well-ventilated room as the fumes are possibly toxic, might be best in a garage with the door flung open, or even outside if the weather is suitable. When the soldering iron is hot, gently sweep across the polystyrene to melt the surface. You can be quite artistic with a soldering iron. You can do as you see fit for this bit. Just use the tool like a pencil and carve various shapes and formations to make a rocky appearance. Remember that the polystyrene is thin, so press lightly if you do make a hole however, a suitable 'filler' piece can be made quite easily.
For the paint it's best to mix black enamel paint with white poster paint. As these two don't mix properly, it will give the rock a weathered, more realistic texture which really adds to the effect. Mix them together but don't be too worried if they aren't completely mixed, rocks often look better darker in places and lighter in others! Apply enough paint to ensure there is no white visible. You don't need to paint the back but it's a good idea to paint the top and sides as these may become visible when placed on the scene. There you have it, one painted rock face. This will take a few hours to dry, as although the poster paint dries relatively quickly, the nature of the enamel paint and the mixture means it takes longer. Once dry, the rock face can be fixed in placed with wood glue, pva or hob-e-tac, but NOT superglue, which will melt your rock face and all your hard work into a sticky mess. When in position, apply some scenic scatter to the top to make the rock face seem to blend into the hill, and make it look less like someone's just stuck it there!
6) Sand is a good option to use for a variety of appearances. Apply plenty of thin glue to the area to be covered then liberally force plenty of sharp sand (silver sand is the best) onto the area. The whole of the glue must be hidden by the sand, and once dry shake off the excess.
7) To emulate other scenic effects with paint see below:
Chalk. Mix the sand with the glue and plaster, and do not throw on sand afterwards. First a thin wash of yellow, then in parts the faintest tinge of carmine, and a line or two with a lead pencil to mark the strata. Damp, slimy surfaces may be dark green. Varnish if intended to look wet.
Sandstone. The colours are similar, but the points may be whitened, red sand dusted on in parts and horizontal places made slimy.
Rough sea rocks. These are almost black, with green edges and the faintest trace of white over all. Varnish if intended to look wet. Very suitable for white or light sea birds.
Footprints on mud. These are sometimes dark slate colour, sunk about ¼ inch. deep.
Peat. This is often used for groundwork, especially where time is an object It can be carved into any shape, glued and nailed down, and then
covered with plaster, etc., as above.
Virgin cork. This is useful for sharp irregular rocks, and for tree trunks.
Branches. These may be made of any shape by wrapping tow round wires, then covering all with glue and throwing on powdered lichens. But they are easiest made by nailing small branches together in various directions and concealing the junctions with glue and wadding, then covering with lichens. Oak is the best wood to use, but it must be thoroughly well dried and have plenty of turpentine, slightly coloured with green paint, put over it when fixed together. The paint improves the appearance, and the turpentine destroys small larvae.
Ferns. The English ferns suitable for cases are but few, the best being the common brake. This should be gathered on a dry day in autumn, pressed between sheets of newspaper or blotting-paper, and, when dry, coloured with oil paints. They look better if varied in colour; therefore colour some with light green, making the centres darker. Others can be coloured with stone colour or yellow, with brown or red centres. (These have quite faded.) Some are green, with the tips brown (beginning to fade); others are green on one side and brown on the other, and so on. They may be bent to almost any shape when the paint is dry by being carefully drawn between the finger and thumb.
7)Grasses. Any hayfield supplies a variety of grasses, which, when in seed, dry well and readily take dye; but dull colours only should be used, and most grasses, indeed, are best used uncoloured. Many coarse grasses (not the seed stalks) grow near the sea and in uncultivated places, in tufts, and most of these dry well and can be easily coloured. Hosts of the seed stalks of weeds may be collected in late autumn, and take colour nicely, but the seed must be removed first. Use oil colours for all ferns, grass, etc There are a number of artificial alternatives which nowadays look very authentic.
Grass imitating felt: This stuff comes in sheets of 1m squared and is cut to fit and glued down. It has the feel of coarse fir. This stuff is not cheap but allows you to cover a large area quickly with no mess. it is also more resilient than using scatterings.
Scatterings: They come in all shapes sizes and colours including grass. First you spread glue over the area you want to cover. Use a lot of glue as this stuff often falls off if you don't. Then spread the scatterings over the glue. It is a good idea to use a sieve to control the amount you use and/or a brush to move it in to all the gaps. Neither are essential but are useful. Once dried use a clean dustpan and brush to collect all the lose scatterings so they can be re used. Don't use a Hoover as this can pull of a lot of the glued down material. It is my advice to paint the board under the scattering the desired colour so that any fall of due to wear and tear will not show through.
Another option is to use hessian carpet matting (the underside of most old carpet will do) which you coax the fibres from into small tufts and either paint of leave as a dull brown for a dried grass effect. This is particularly suitable for rough grass.
Static Grass: If you want that 3 dimensional grass effect, go for static grass, it's simple and effective. The grass is in the form of tiny synthetic fibres, in various lengths and colours. Using a simple puffer bottle* you apply it to neat PVA glue, it becomes charged with static electricity and stands on end, giving that 3D effect, the procedure is as follows:
a) Work on an area about 300mm square at a time. Paint the area you want to grass a suitable under-colour, a mix of greens and browns is best.
b) Sieve some of the grass fibres to remove any clumps, and fill the puffer bottle about half way up (don't fill it to the top as it becomes a tightly bunched mass and won't come out).
c) Apply a coat of PVA glue to the area you want to grass, ensure the area is totally covered but don't worry about the odd blob as this just adds texture
d) Holding the puffer bottle about 100-150mm from the surface start puffing gently. Build the grass up slowly working around the area, puffing from different angles.
e) As you go along give the bottle a gentle shake every so often to loosen clumps.
f) Build the grass up to the thickness you want, don't worry if the glue still shows through, it dries transparent and you won't see it.
g) Every so often gently blow over the grass to loosen any stray particles, and to check your coverage. Some recommend passing a vacuum cleaner with a piece of cloth over the nozzle over the area, to lift the particles a bit, but take care not to suck it all off!
h) Once dry (best to be patient leave it a few hours) suck or blow off the excess.
i) That's the basic principle. The grass is available in many colours and lengths. It's best to experiment before starting on your actual scene. A good technique is to lay down some long grass, and then over lay with short grass. Any bald patches that appear can be touched in after, and laying one layer on top of another is good for a 'scrubby grass effect'. The key is to experiment it's good fun
8) Seaweeds. These must be well washed in order to remove the salt, and should be varnished if intended to look wet. Starfish dry well (after being well washed), but should be tinted to restore the colours. These and shells, as well as all the above, are fixed sufficiently tightly with glue.
9) Water. To produce a good water effect you need to produce a reflective surface. The method I have seen used involves using a sheet of glass or perspex, painting the underside a dark colour, try experimenting with dark green, brown or even black and then countersinking it in to the false bottom of your cabinet. Don't worry if it is not the intended shape. you can produce the desired shape by covering the Perspex with scenic scatter. For more authenticity use brush bristles painted a yellowy brown to imitate reeds or green to imitate ling grass and weeds. For best results position your specimen the opposite side of the viewing point of the water feature so that it will be reflected in the water instead of something you don't want such as the wall. When finished the Perspex will reflect the light from the surroundings and give you a perfect water reflection but it is important that the plastic is very clean and clear. This is why glass is often used as it does not mark and can be polished up.
There you are, a number of ideas to embellish the display of your specimens. Hope you find them useful.
10, Well 9, Great Taxidermy Display Tips
Soldering Supplies
Dec 14, 2011 09:14:06
Click for larger image and other views
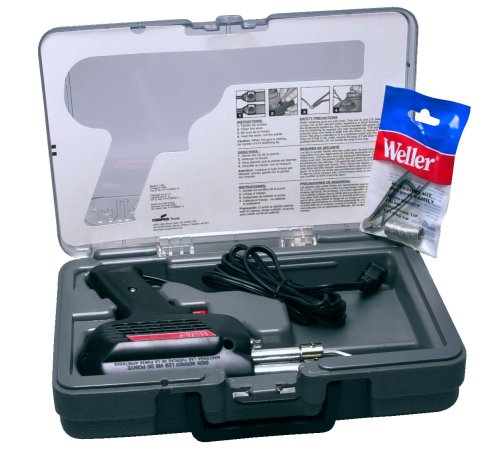
 >> Click here to update Christmas prices for Weller D550PK 120-volt Professional Soldering Gun Kit 260/200 Watts <<
Christmas Sales Weller D550PK 120-volt Professional Soldering Gun Kit 260/200 Watts Feature
- Fingertip trigger selects high (260-watts) or low (200-watts) for controlled output
- Designed with pistol grip for comfort and ease of use
- Features twin lights to illuminate your work
- Heats up quickly; ready to use in only 6 seconds
- Includes an assortment of accessories in a molded plastic storage case
Christmas Sales Weller D550PK 120-volt Professional Soldering Gun Kit 260/200 Watts Overview
Soldering Gun Kit 260/200W Soldering Gun With Tin Plated Copper Tip 2 Untinned Tips fluxbrush Soldering Aid Tool Coil 40/60 Rosin Core Solder Plastic Carry Case Soldering Hints Booklet.
SAVE NOW on Christmas Sales Offers below!
Available In Stock. |
| This Christmas Weller D550PK 120-volt Professional Soldering Gun Kit 260/200 Watts ships for FREE with Super Saver Shipping. |
|

Limited Offer Today!! Weller D550PK 120-volt Professional Soldering Gun Kit 260/200 Watts Christmas and Cyber Monday 2011 Deals
Headrest Tv Wine Glass Cookie Cutter Protein Mix